Full Node Remote Access
Update: the recommended way to enable remote access to IRI API port (e.g. for wallets) is via HAProxy. Please refer to Running IRI API Port Behind HAProxy.
1. Exposing IRI Port Externally
IRI has a command-line argument (“option”) --remote true. Here’s an explanation on what it does:
By default, IRI’s API port will listen on the local interface (127.0.0.1). This prevents any external connections to it.
Using the --remote option, IRI will “listen” on the external interface/IP.
We are going to have to edit the configuration file to enable this option and restart IRI. Follow the next steps.
Note
To edit files you can use nano which is a simple editor. See Using Nano to Edit Files for instructions.
The --remote option can be specified in the configuration file:
- on CentOS
/etc/sysconfig/iri - on Ubuntu
/etc/default/iri
Edit the file and find the line:
OPTIONS=""
and add --remote true to it:
OPTIONS="--remote true"
Save the file and exit, then restart iri: systemctl restart iri
After IRI initializes, you will see (by issuing lsof -Pni|grep java) that the API port is listening on your external IP.
You can follow the instructions below on how to enable access to the port on the firewall.
Note
By default, this installation is set to not allow external communication to this port for security reasons. Should you want to allow this, you need to allow the port in the firewall.
Expose IRI API Port in Firewall
Allowing the port via the playbook
If you followed the steps above (enabling the --remote true option in the configuration file) you will need to allow the port in the firewall.
You can do this using the playbook which as a bonus also adds rate limiting.
On CentOS:
cd /opt/iri-playbook && git pull && ansible-playbook -i inventory -v site.yml --tags=iri_firewalld -e api_port_remote=yes
On Ubuntu without rate limiting:
cd /opt/iri-playbook && git pull && ansible-playbook -i inventory -v site.yml --tags=iri_ufw -e api_port_remote=yes
On Ubuntu with rate limiting:
cd /opt/iri-playbook && git pull && ansible-playbook -i inventory -v site.yml --tags=iri_ufw -e api_port_remote=yes -e ufw_limit_iri_api=yes
Note
Rate limiting in ubuntu is using ufw which is a very simple wrapper to the iptables firewalls. It only allows one value of max 6 connections per 30 seconds. This might prevent doing PoW on your node if you choose to expose attachToTangle.
Allowing the port manually
On CentOS we run the command (which also adds rate limiting):
firewall-cmd --remove-port=14265/tcp --zone=public --permanent && firewall-cmd --zone=public --permanent --add-rich-rule='rule port port="14265" protocol="tcp" limit value=30/m accept' && firewall-cmd --reload
On Ubuntu:
ufw allow 14265/tcp
And to add rate limits:
ufw limit 14265/tcp comment 'IRI API port rate limit'
Note
Rate limiting via ufw on ubuntu is very simple in that it only allows a value of 6 hits per 30 seconds. This can be a problem if you want to enable PoW – attachToTangle on your node.
Now you should be able to point your (desktop’s) light wallet to your server’s IP:port (e.g. 80.120.140.100:14265).
2. Tunneling IRI API for Wallet Connection
Another option for accessing IRI and/or the iota-pm GUI is to use a SSH tunnel.
SSH tunnel is created within a SSH connection from your computer (desktop/laptop) towards the server.
The benefit here is that you don’t have to expose any of the ports or use the --remote true flag. You use SSH to help you tunnel through its connection to the server in order to bind to the ports you need.
Note
For IOTA Peer Manager, this installation has already configured it to be accessible via a webserver. See Peer Manager Behind WebServer with Password
What do you need to “forward” the IRI API?
- Your server’s IP
- The SSH port (22 by default in which case it doesn’t need specifying)
- The port on which IRI API is listening
- The port on which you want to access IRI API on (let’s just leave it the same as the one IRI API is listening on)
A default installation would have IRI API listening on TCP port 14265.
Note
In order to create the tunnel you need to run the commands below from your laptop/desktop and not on the server where IRI is running.
For Windows desktop/laptop
You can use Putty to create the tunnel/port forward. This can be done for any port on the server. Here we are going to forward the IRI API port from the server to your local machine.
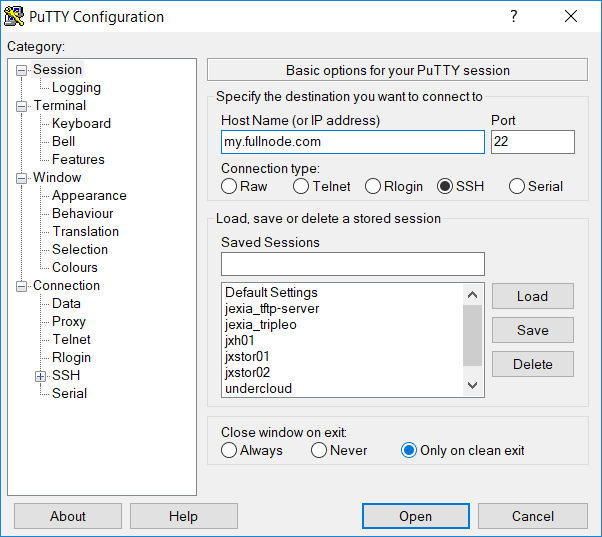
- Open putty and create a new session name. Start by entering the node’s address and SSH port.
- On the menu on the left choose ‘Tunnels’. Then fill in the Source port and Destination as shown in the image below. The destination is comprised of the IP address and the port. We use 127.0.0.1:14265, as this is by default where we want to forward the port from.
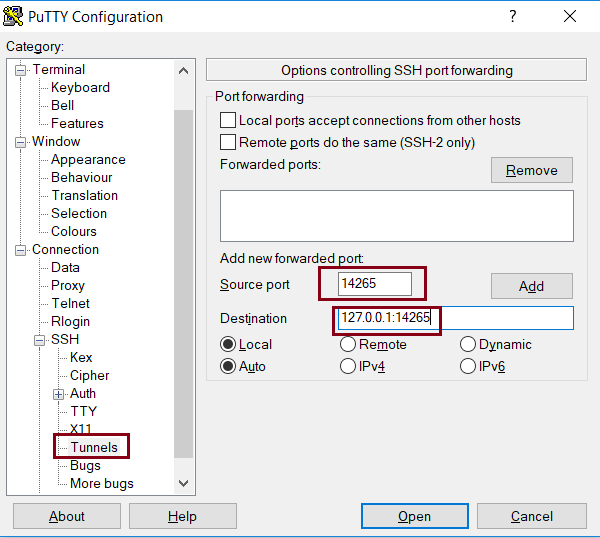
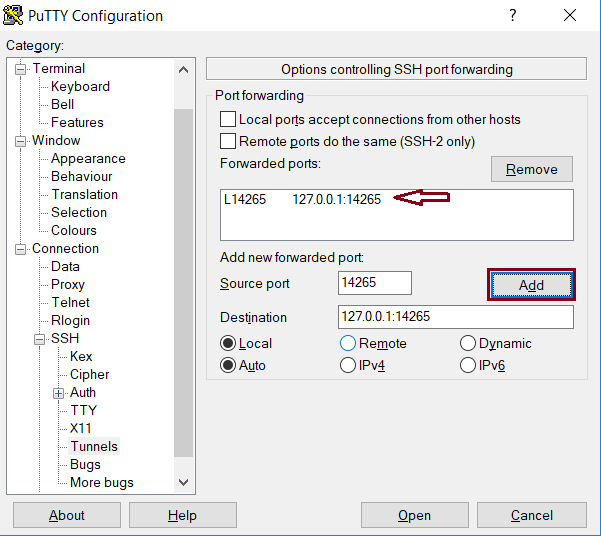
- Next click ‘Add’. You will see that the configuration has been added to the ‘Forwarded ports’ area.
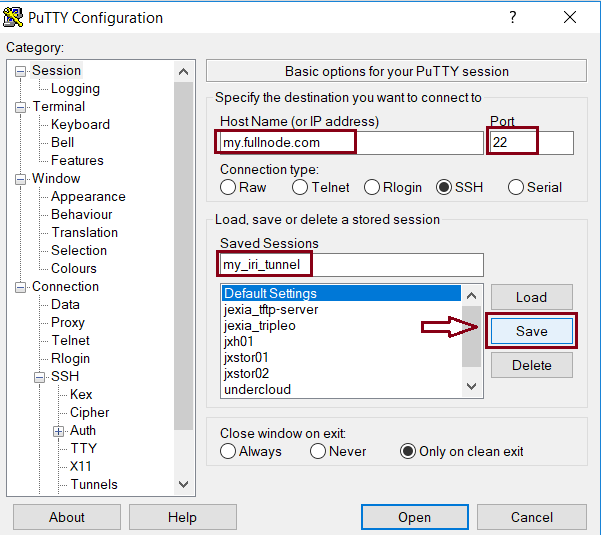
- Back in the ‘Session’ menu, enter a name with which you want to save this configuration/session, last check that the node’s address and port are correct, and click ‘Save’. The session will be added to the list.
- To open the session and start the port forwarding, all you have to do is to load the session and click ‘Open’. To test that the port is being forwarded you can open the browser and point it to
http://localhost:14265. This should reply something in the lines oferror: Invalid API Version. if this is the case, your API port is being forwarded successfully. You can edit the wallet’s node configuration and point it to this address to start using your full node!
For any type of bash command line (Mac/Linux/Windows bash)
Here is the tunnel we would have to create (run this on our laptop/desktop)
ssh -p <ssh port> -N -L <iota-pm-port>:localhost:<iota-pm-port> <user-name>@<server-ip>
Which would look like:
ssh -p 22 -N -L 14265:localhost:14265 root@<your-server-ip>
Should it ask you for host key verification, reply ‘yes’.
Once the command is running you will not see anything, but you can connect with your wallet.
Edit your wallet’s “Edit Node Configuration” to point to a custom host and use http://localhost:14265 as address.
To stop the tunnel simply press Ctrl-C.
You can do the same using the IRI API port (14265) and use a light wallet from your desktop to connect to http://localhost:14265.
Peer Manager Behind WebServer with Password
This installation also configured a webserver (nginx) to help access IOTA Peer Manager. It also locks the page using a password, one which you probably configured earlier during the installation steps.
The IOTA Peer Manager can be accessed if you point your browser to: https://your-server-ip:8811.
Note
The port 8811 will be configured by default unless you changed this before the installation in the variables file.
Limiting Remote Commands
There’s an option in the configuration file which works in conjunction with the --remote true option:
REMOTE_LIMIT_API="removeNeighbors, addNeighbors, interruptAttachingToTangle, attachToTangle, getNeighbors"
When connecting to IRI via an external IP these commands will be blocked so that others cannot mess with the node’s configuration.
Below we describe how to edit these commands, if necessary.
Note
To edit files you can use nano which is a simple editor. See Using Nano to Edit Files for instructions.
- On CentOS edit the file
/etc/sysconfig/iri - On Ubuntu edit the file
/etc/default/iri.
This option excludes the commands in it for the remote connection. This is to protect your node.
If you make changes to this option, you will have to restart IRI: systemctl restart iri.