Security Hardening
In the following chapter some advice and tutorials on how to secure your Linux system.
It includes disabling SSH root access, switching SSH port, creating SSH keys and more.
SSH Key Access
On most servers, password authentication is allowed by default making the server more susceptible to SSH password brute forcing. Switching to SSH key access only is a first good step in making your server more secure.
Once SSH keys authentication is configured (using a user other than root), it is safe to disable password authentication and root SSH access.
Note
Most VPS providers provide a terminal/console access to the server. This is NOT SSH, and can be used to recover access to your server if you get locked out SSH (e.g. configuration error, missing SSH keys, firewall lockout etc.)
Overview
We are going to:
- Create a user with sudo rights (if none exists)
- Explain how to create SSH keys (using puttygen - this is for Windows users)
- Allow for SSH key access using the aforementioned user
This guide is focused on using Putty as a SSH client. If you are using Mac, the process of creating a user on the fullnode server and setting SSH access is the same.
Access User
The first step is to ensure you have a user on the system other than root. Then, grant this user “sudo” privileges.
The following commands assume that you are currently operating as user root (verify with whoami).
If you already have a user with sudo privileges you can skip this part.
- Create the user, you can choose a name, and a home directory:
useradd -m -d /home/myusername myusername
- Set a password for the new user:
passwd myuser
- Add the user to the “sudoers”:
echo "myuser ALL=(ALL) NOPASSWD:ALL" >/etc/sudoers.d/myuser && chmod 440 /etc/sudoers.d/myuser
- Check the user is configured properly, run the following commands:
su - myuser
sudo su
whoami
The above should result in root. This means that the new user can become root.
Note
It is worth mentioning that a slightly more secure approach would be to add the user to group wheel.
The difference is that if you add the user to group wheel, each time you try to become root you will have to enter the user’s password.
Should you want to use this approach, skip step 3 and run usermod -aG wheel myuser instead.
If you already performed step 3, you can simply remove the file /etc/sudoers.d/myuser.
At this point you should be able to SSH into your server using the new user + password. For example: ssh myuser@myfullnode for cli, or use Putty.
Creating SSH Keys
You can download Putty for Windows here. Install the MSI (“Windows Installer”) package.
The installer includes: putty, puttygen and pagent.
The first step is to create SSH keys. A SSH key pair consists of a private key and a public key (never share your private key with anyone and keep it safe!).
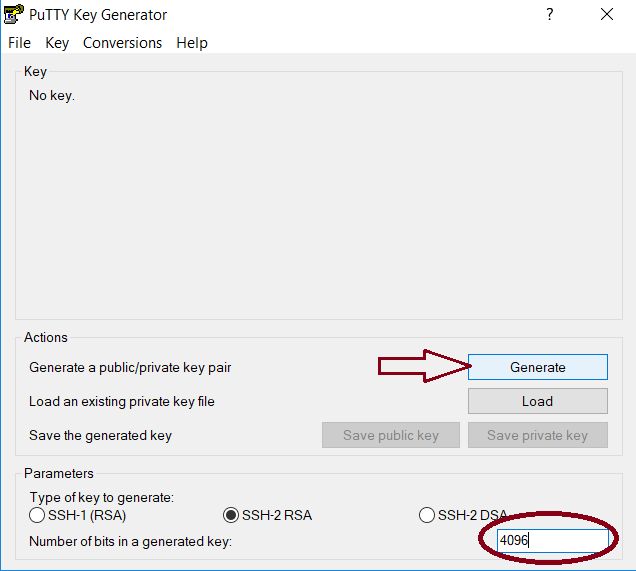
- In Windows, open the application called
PuTTYgen. Set the number of bits to 4096 and clickgenerate:
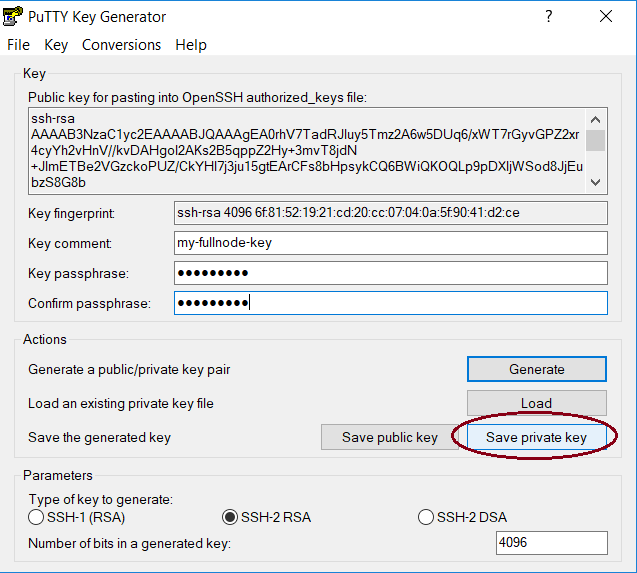
- Once the key is generated, fill in the comment, choose a (strong) password and click “Save private key”. Don’t close Puttygen yet!
Remember where you save the key to. We are going to use it in the following steps.
- On the server, make sure you are operating as the user you’ve created earlier (
whoamito verify, orsu - myuserto switch to the user). - Create the ssh folder:
mkdir -p ~/.ssh
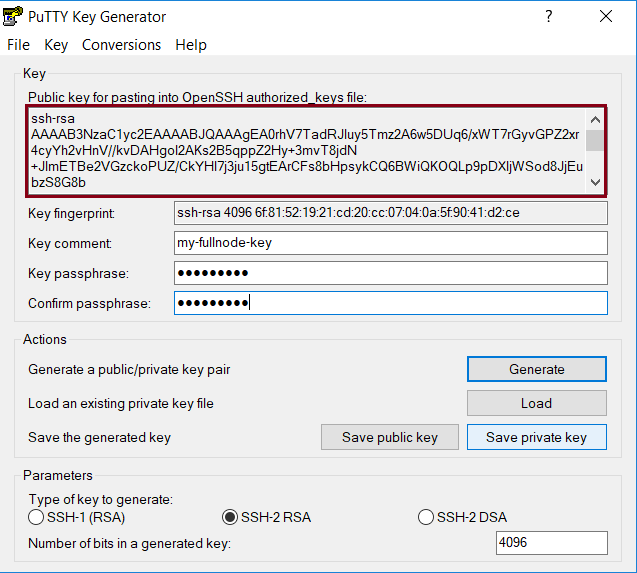
- Select and copy the entire ssh public key from puttygen (see image below). Then, using nano or vi editor, add the public SSH key to a new file
~/.ssh/authorized_keyson the server.
See Using Nano to Edit Files to learn how to use nano.
- Set correct permissions:
chmod 700 ~/.ssh && chmod 600 ~/.ssh/authorized_keys
Now you should be able to access the server using the SSH keys.
You can close Puttygen. If needed, you can always run puttygen again, create a new key, load an existing key (it will require the password you’ve configured with it), replace the password or copy the public key from it.
Access Using the SSH Keys
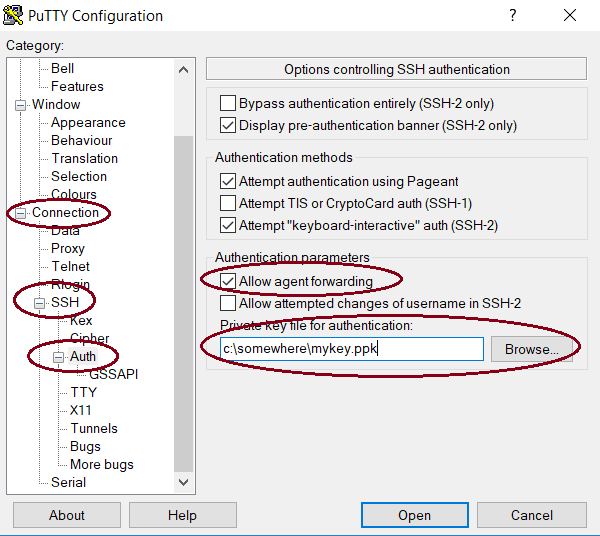
- Open the application
Putty. On the left side you will have a tree browser. Open “Connection”, “SSH”, and “Auth”. Configure as shown in the image below, browse the file system to select the private ssh key you’ve created earlier:
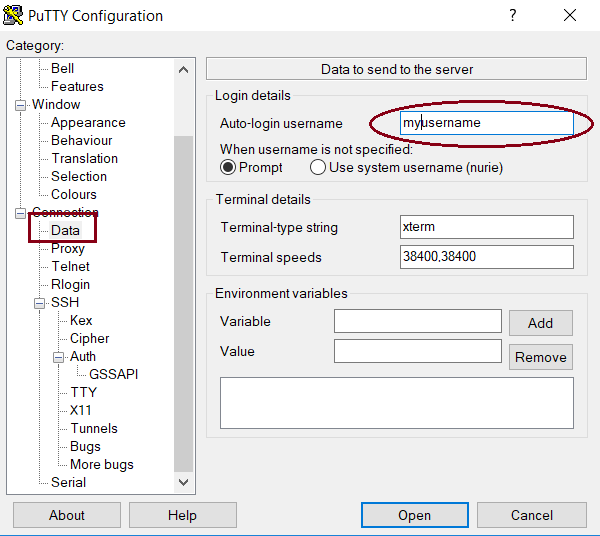
- Next open the “Data” option and set the username you’ve created on the server:
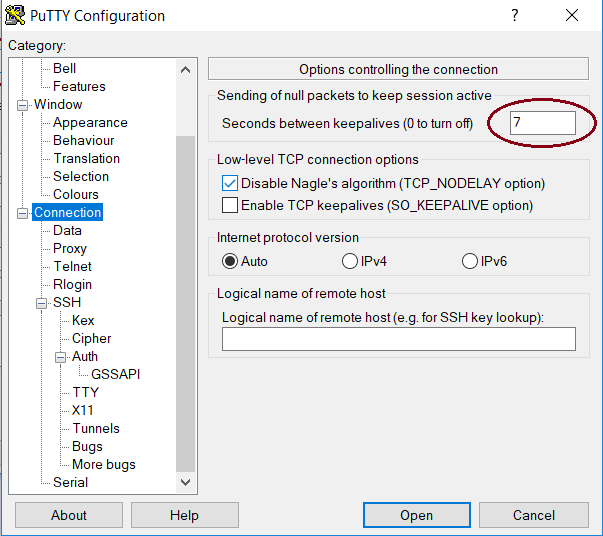
- Then, on the “Connection”, set a keepalive value (5 or 7 is fine):
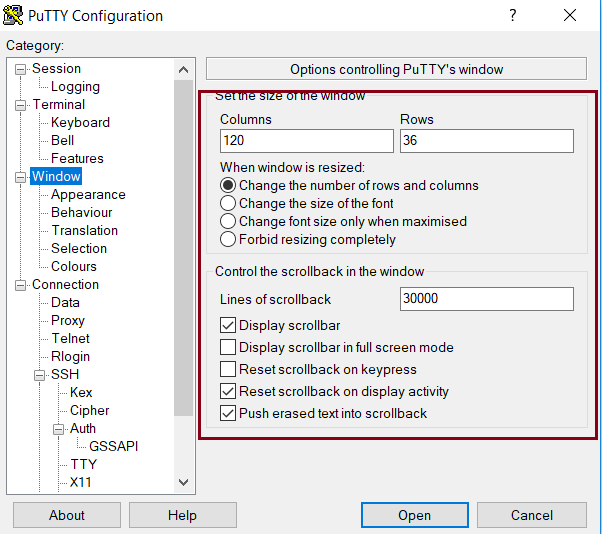
- On the “Window”, set the Columns, Rows and Lines of scrollback as shown here:
- Now go to “Session” and set on the top your servers IP address (or hostname). In Saved Sessions choose a name and click save:
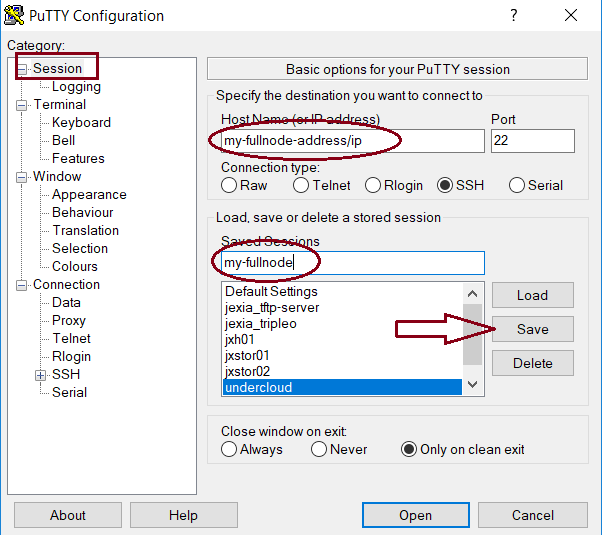
- Now, or any time you open Putty, you can select this saved session and click “Open”. This should connect you to the server. You will be asked to provide the SSH key password (not the user’s password from the server!)
Below is explained how to load the SSH private key to pagent – in which case you will not have to repeatedly enter the key’s password every time you connect to the server.
Adding SSH Key to Pagent
Pagent is a utility that was delivered with Putty. It loads the SSH private key into memory and allows you to connect to the server without having to enter the key’s password every time.
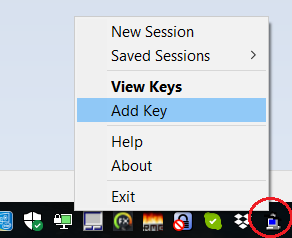
Once you open pagent you will find its icon on the task bar’s icons. Right clicking it opens a menu where you can select “Add keys”:
Browse the filesystem to select your private key. Enter the password, and that’s about it.
Now, everytime you connect to the server using Putty you should not be asked to enter the password again.
Disabling Password Authentication
In this part we will disable SSH password authentication to the server, thereby making it less susceptible to password brute forcing.
You need to run the following commands as user root, either by becoming root i.e. sudo su or prepend sudo to the commands e.g. sudo systemctl restart sshd.
Warning
Only follow these steps if you’ve successfully completed the previous chapter and can access your server using SSH keys!
Disable
Disable SSH password authentication:
grep -q "^PasswordAuthentication" /etc/ssh/sshd_config && sed -i 's/^PasswordAuthentication.*/PasswordAuthentication no/g' /etc/ssh/sshd_config || echo "PasswordAuthentication no" >> /etc/ssh/sshd_config
Restart SSH daemon:
systemctl restart sshd
If you want to test this, you need to make sure you unload the SSH keys from pagent (exit paget), and manually connect to the server from Putty (not via the saved session - because the saved session has the keys already configured in it).
If all okay, you will be refused and not able to connect without SSH keys.
Enable
If you wish to re-enable the password authentication, run:
sed -i 's/^PasswordAuthentication.*/PasswordAuthentication yes/g' /etc/ssh/sshd_config
And restart sshd daemon:
systemctl restart sshd
Disabling SSH Root Access
Disabling SSH root access to your server makes it less likely to be hacked. In the previous steps you might have already enabled SSH key only access. That already means, that if root doesn’t have any SSH keys configured, nobody will be able to access root via SSH.
Nonetheless, it is a good practice to disable the root account from being accessible via SSH.
Disable:
sed -i 's/^PermitRootLogin.*/PermitRootLogin no/g' /etc/ssh/sshd_config
And restart ssh daemon:
systemctl restart sshd
To re-enabled root access:
sed -i 's/^PermitRootLogin.*/PermitRootLogin yes/g' /etc/ssh/sshd_config
And restat sshd daemon as shown above.
Using Alternative SSH Port
SSH by default uses port 22. That means that any hacker trying to force his way into a server will try hammering this port. One of the most simple ways to get rid of those attempts and make them useless is switching to an alternative port number.
There are more than 65k ports on a Linux system to choose from. No hacker is going to bother and try to find the SSH port if he doesn’t find it on 22 to begin with. They much rather save time and skip to a different server where SSH is on port 22.
To change the port, a few things have to be done. The most important step is to ensure that you have some terminal/console access provided to you by your hosting provider. This is important in case you lock yourself out. Then you can still access the server and revert or fix any faults.
Warning
I’d like to repeat this again: make sure you have a terminal or console access to your server provided by the hosting provider. It is very important in case something in the configuration goes wrong and you cannot access using SSH anymore.
Firewall
Choose a port number (let’s say 9922) and allow it through the firewall.
The following command have to be run as user root or by prefixing the commands with sudo e.g. sudo yum install policycoreutils-python.
CentOS
Run:
firewall-cmd --add-port=9922/tcp --zone=public --permanent && firewall-cmd --reload
And tell Selinux we want to use this port:
semanage port -a -t ssh_port_t -p tcp 9922
If the command gets an error that semanage was not found, make sure to install it and re-run it afterwards:
yum -y install policycoreutils-python
SSH Daemon
Edit the file /etc/ssh/sshd_config and find the line with # Port 22.
There might be a # before Port (or not). In any case, make sure to remove the # and any trailing spaces. Set the new port number:
Port 9922
Save the file and restart sshd daemon:
systemctl restart sshd
Your current SSH connection will not drop. But you should be able to see SSHD listening on the new port:
lsof -Pni|grep sshd
Next, configure your putty session (click “Load” when selecting your saved session, change the port number and click “Save”, then “Open”).