Load Balancer
The new release of IRI-playbook Docker version introduces a valuable feature: a highly-available load balancer based on HAProxy and Consul as the registry backend.
HAProxy is installed by default on all IRI Playbook installations. When HAProxy is used on a single node – not in a cluster – it doesn’t really function as a load balancer, but simply as a reverse proxy for IRI’s API port. Nevertheless, it includes rate-limiting and other security policies out-of-the-box.
Consul is used in combination with Consul-template to provide HAProxy with a dynamic registry of backend nodes. This means that you can register multiple IRI nodes to Consul to benefit from HAProxy’s load balancing capability. Consul holds the database containing a registry of all the nodes you want added to the load balancer. In addition, Consul runs periodic health-checks on the nodes to ensure they are performing well.
Please consider the following:
Note
It is strongly recommended NOT to use the load balancer feature to register unknown nodes. Please make sure you only use the load balancer feature for your own cluster of nodes. There is no way to check whether unknown nodes are up to no good.
Disclaimer: I take no responsibility for any problems that might arise due to ignoring the recommendation above.
Overview
For command examples for Consul, please refer to this document.
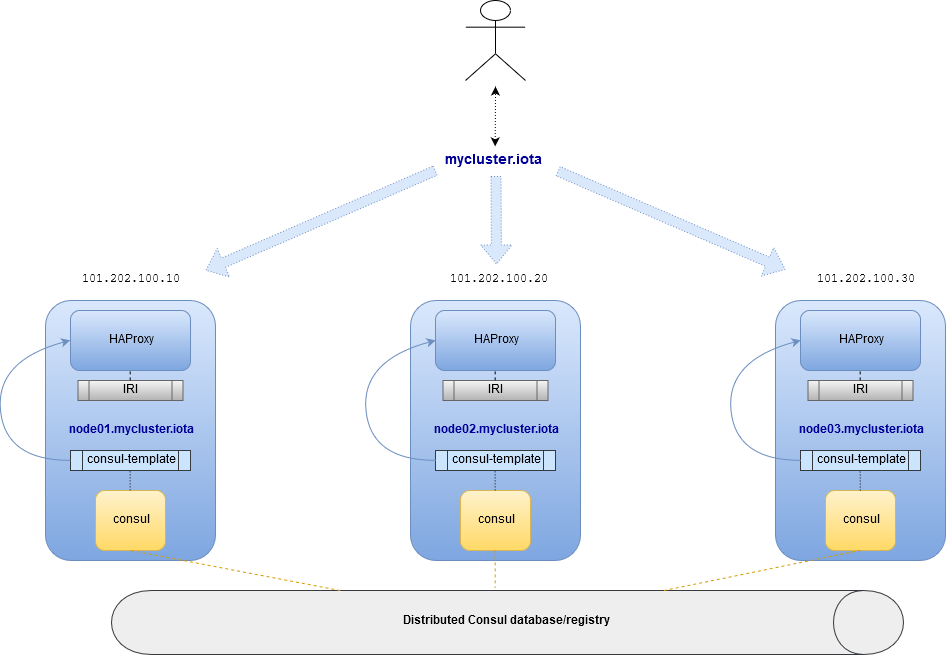
The highly-available setup diagram:
Consul
The IRI docker playbook allows to deploy nodes with both HAProxy and Consul. If your deployment consisted of multiple nodes, Consul nodes will forms a cluster, offering a distributed configuration database for HAProxy.
Consul nodes share a key/value database, distributed services and health-checks registry. A service, in our case, is an IRI node. The health-check associated with a service can be a simple bash script that run some validations on the service.
Each IRI node registers itself with its local Consul daemon. Subsequently, it becomes visible to all other Consul daemons. When a new node is registered, Consul initiates health-checks to that node. If the node is considered healthy, it will become available across the entire cluster on all the instances of HAProxy. Health checks run periodically, and if a failure is detected, that nodes become unavailable on all HAProxy nodes until it recovers.
Let’s recap:
- HAProxy is a load balancer/proxy.
- Consul acts as a distributed key/value database, service registry (discovery) and able to initiate health-checks.
- Consul and HAProxy are installed by default, on a single or multiple node installation.
- Consul forms a cluster when installed on multiple nodes, offering distributed highly available registry.
- HAProxy configures its routes (aka backends) based on Consul’s registry.
- Based on Consul’s health-checks, backends become registered or de-registered from the load balancers (HAProxy).
- Because Consul is distributed, HAProxy on all nodes get configured similarly.
Server and Agent
Consul is able to run in two modes: server and agent. Server mode in itself is also an agent, but is also able to become a cluster member forming a quorum with other server-mode Consul nodes. You can deploy 3 or more consul servers to form a highly available, fault-tolerant cluster (3 or more nodes are required to achieve quorum: always use an odd number equal to or larger than 3).
In the most basic setup, the IRI Docker Playbook will install all IRI nodes with Consul in server mode. This will form a very robust cluster.
An important note about Consul: when you register a service, the node on which you have registered the service becomes its “parent”. If this node becomes unavailable, so does any service that has been registered on it.
What this means is: the recommended way to add new nodes to your cluster is by installing them via the playbook: adding them into the inventory-multi file. This will configure everything out-of-the-box and is less error prone than any manual method.
If you cannot do that, and simply want to add already existing nodes to your cluster, you have two options:
Option 1
Install Consul agent on such nodes manually, copying the /etc/consul/conf.d/main.json and editing it as required (IP addresses etc).
Manually open required firewall ports for Consul to communicate with other Consul members.
Register the node in its own Consul agent (will become available on the load balancers)
Option 2
Register the new nodes to any of the existing Consul nodes. The downside being that if that Consul node goes down, the node you have registered on it will also be considered unavailable.
HAProxy
With the Consul role enabled during an IRI playbook installation, the HAPRoxy default configuration file is replaced with a template. The template’s values are then populated by the Consul-template service. The Consul-template service watches Consul for any changes in service and/or health-check registry.
When a new service is registered and health check passes, Consul-template automatically edits HAPRoxy’s configuration template and issues a hot-reload. The same happens if a service is deregistered, updated or health-check fails.
Configuration Options
Options
There are two options:
- Single IRI node/load balancer
- Three or more IRI nodes/load balancers
For the first option – a single IRI node is required – installed with the IRI Playbook Docker version. HAProxy, Consul and Consul-template will also be installed on it. This node registers its own IRI to its Consul and is available to receive API calls. It is also possible to manually register new services (IRI nodes) to it.
The disadvantage of a single node is being a single-point-of-failure (SPoF). If it is down, all the instances that are registered on it become unreachable through it.
For the second options, the recommendation is to use at least three nodes in order to form a minimum requirement for creating quorum. In addition, an odd number of nodes should be used. With an odd number of nodes it is possible to reach consensus on who are the active nodes in the cluster.
Deployment of the mutli-node setup requires following the manual installation instructions of the IRI Docker playbook.
Centralized Management for Multi-nodes
At time of writing, there is no centralized management interface for administration of all nodes in the cluster via a centralized panel.
Some functionalities such as enabling HTTPS (+letsencrypt) is centralized via iric: it is possible to enable HTTPS for all nodes and request a certificate. Requirements are:
Have a fully qualified domain name for each node Have a single qualified node for the cluster (with multiple A records, each pointing to a node in the cluster).
For example:
101.202.100.10 node01.mycluster.iota
101.202.100.20 node02.mycluster.iota
101.202.100.30 node03.mycluster.iota
Load balancer’s address:
101.202.100.10 mycluster.iota
101.202.100.20 mycluster.iota
101.202.100.30 mycluster.iota
In DNS settings the TTL for the load balancer’s fully-qualified-domain-name record is best set to 1 minute.
High Availability
High availability is possible to achieve when installing a minimum of 3 cluster nodes: it is very unlikely that more than one node at the same time fails. If one node fails, there are still 2 nodes operational.
In this documentation we don’t get into configuration of a virtual IP and keepalived, which is one option for keeping a working/accessible IP on one of the nodes (keepalived uses VRRP protocol and makes sure the virtual IP is always configured on at least one active node).
We’ll be using simple DNS multiple A records. For example, the hostname mycluster.iota. It is possible to configure in any DNS panel multiple A records for this hostname. An A record points a hostname (or hostnames) to an IP address.
As seen in the previous section (Centralized Management for Multi-nodes), we provide an example of these 3 nodes:
101.202.100.10 node01.mycluster.iota
101.202.100.20 node02.mycluster.iota
101.202.100.30 node03.mycluster.iota
The load balancer’s fully-qualified-domain-name is configured with three A records:
101.202.100.10 mycluster.iota
101.202.100.20 mycluster.iota
101.202.100.30 mycluster.iota
In DNS settings the TTL for the load balancer’s fully-qualified-domain-name record is best set to 1 minute.
We configure mycluster.iota with 3 A records, each record with each node’s IP address pointing to the hostname mycluster.iota. A TTL (time-to-live) can usually be configured: it defines the time a DNS server should cache the record. For our scenario it is recommended to set it low (e.g. 60 seconds).
DNS uses round-robin by default (the associated IP address to the hostname are rotated in each reply from the DNS server).
Quick Installation Example for Multiple Nodes
Below are the quick installation command for both Ubuntu and CentOS.
Prerequisites:
- At least 3 strong nodes (2 CPUs, 4GB RAM at least, though doube than that is recommended for smooth operation).
- Configure each node with a unique fully-qualified-domain-name in DNS.
- For sharing an SSL certificate for the load balancer, a single fully-qualified-domain-name in DNS pointing to all the node’s IP addresses (multiple A records).
- Centos 7.5, Ubuntu 18.04 and Debian 9.5 have been tested for this setup.
Note
The configuration examples below are to be perform on one of the nodes in the cluster. Pick one of the nodes to be the “installer” node and make sure it is the first one listed in the inventory file (more about the inventory file below).
Ubuntu/Debian
Become root via:
sudo su
(The recommended way is to prepend sudo to each command, but for sake of the tutorial and installation steps you are fine becoming root).
Install updates:
apt update -qqy --fix-missing -y && apt-get upgrade -y && apt-get clean && apt-get autoremove -y --purge
Check if reboot file exists. If it does, issue a reboot:
test -f /var/run/reboot-required && reboot
Install Ansible on Ubuntu:
apt-get upgrade -y && apt-get clean && apt-get update -y && apt-get install software-properties-common -y && apt-add-repository ppa:ansible/ansible -y && apt-get update -y && apt-get install ansible git screen nano -y
Install Ansible on Debian:
echo 'deb http://ppa.launchpad.net/ansible/ansible/ubuntu trusty main' >> /etc/apt/sources.list && apt-key adv --keyserver keyserver.ubuntu.com --recv-keys 93C4A3FD7BB9C367 && apt-get update -y && apt-get install ansible git screen nano -y
CentOS
Update packages:
yum update -y
Ensure Selinux is enabled (this is recommended to run on each node in the cluster before running the playbook):
grep '^SELINUX=enforcing' /etc/selinux/config || sed -i 's/SELINUX=.*$/SELINUX=enforcing/' /etc/selinux/config && echo "Selinux enabled, rebooting..." && reboot
Install some useful packages:
yum install epel-release -y && yum install ansible git nano vim screen curl lsof tcpdump yum-utils bind-utils nc -y
If hasn’t been done already, check if the node needs a reboot due to new kernel packages:
needs-restarting -r
This command will let you know if a reboot is required. You can reboot the node by issuing the reboot command.
The next steps are the same for both CentOS and Ubuntu
Ubuntu/Debian and CentOS
Clone the repository, specifically the dockerized version:
cd /opt && git clone -b "feat/docker" https://github.com/nuriel77/iri-playbook.git && cd iri-playbook
Configure a username and password and add some configuration options.
NOTE make sure to configure your own username and password before pasting this command!
cat <<EOF >/opt/iri-playbook/group_vars/all/z-iri-override.yml
fullnode_user: iotaadmin
fullnode_user_password: 'AllTangle81'
install_docker: true
install_nginx: true
lb_bind_address: 0.0.0.0
memory_autoset: True
EOF
Chmod the file:
chmod 600 group_vars/all/z-iri-override.yml
To enable Consul for this installation:
grep -qir "^consul_enabled: [yes|true]" group_vars/all/z-consul-override.yml >/dev/null 2>&1 || echo "consul_enabled: yes" >> group_vars/all/z-consul-override.yml
And configure remote api port:
grep -qir "^api_port_remote: [yes|true]" group_vars/all/z-consul-override.yml >/dev/null 2>&1 || echo "api_port_remote: yes" >> group_vars/all/z-consul-override.yml
Copy the example inventory-multi.example to inventory-multi:
cp inventory-multi.example inventory-multi
At this point you should edit the inventory-multi file manually. Here’s an example how it might look after you have it configured… Make sure you have a unique fully-qualified-domain-name for each node, as this will allow you to obtain a common SSL certificate (letsencrypt) for all nodes:
NOTE that for Ubuntu and Debian you have to remove the # on the line of the ansible_python_interpreter !!!
# Example configuration of multiple hosts
[fullnode]
node01.myhost.com ip=110.200.10.20
node02.myhost.com ip=110.200.10.21
node03.myhost.com ip=110.200.10.22

[fullnode:vars]
# Enable this line for Ubuntu and Debian only!
ansible_python_interpreter=/usr/bin/python3

# Only set this line if you didn't ssh to the servers previously
# from the node where you are about to run the playbook from:
ansible_ssh_common_args='-o UserKnownHostsFile=/dev/null -o StrictHostKeyChecking=no'
Run the installation:
ansible-playbook -i inventory-multi site.yml -v -e images_from_master=yes
If your connection to the server breaks (network timeout), you can return to the server and re-run the command above (make sure to be in the /opt/iri-playbook directory and run it as root).
NOTE that the option images_from_master=yes has been added. This ensures that all Docker images are initially pulled to the main installation node and then copied to the other nodes. Sometimes having 3 nodes pull the same image from Dockerhub at the same time is rather slow.
SSL Certificate
If you want to install letsencrypt (free SSL certificate) there are the following requirements:
You need to have a single fully-qualified-domain-name pointing to the IP addresses of each node (multiple A records)
Each node should have its own unique fully-qualified-domain-name (hopefully you have configured these names in the inventory-multi file)
All the nodes must share the same SSL certificate for the given fully-qualified-domain-name. This will be done by iric.
You can use iric to enable HTTPS for your node. Because you have the inventory-multi file configured, iric will make sure to enable HTTPS on all the nodes of the cluster. You will also be able to request for a certificate.
It is not necessary to request for a certificate for nginx, as nginx is serving services that are unique for each node (unlike the load-balancer).
Reconfiguring Node’s Registry
The playbook has automatically registered each node into Consul. The file which has been used can be found in /etc/consul/service_this_node.json. This file can be edited and re-loaded into Consul.
For more information on how to work with Consul on the load balancers, please refer to this document.